Jupyter Notebook Configuration and Usage on RUPC
Configuration
Introduction
The simplest traditional way to start the Jupyter Notebook on a cluster is to make ssh -Y connection to the cluster and simply typejupyter-notebookcommand in terminal. Next one has to wait for a minute or two before the browser window appears and one can start to work. The browser which was launched on the cluster will be very slow and hardly responsive, depending on the network speed and the load. The approach described below is different. It is based on usage of Virtual Private Network (VPN) to connect the cluster and your computer using private network which provides secure connection to the cluster. Moreover in this approach one can use local browser to access the Jupyter Notebook launched on the cluster. This way one transfers only a small amount of information between the cluster and local computer. It also doesn't require to configure the firewall as it uses private i.e. not public network for the cluster access.
Prerequisites
To use Jupyter Notebook on the cluster one has to install openVPN on your computer.
To install openVPN please do the following steps .
OpenVPN allows secure private connection to the cluster from anywhere.
One Time Configuration on RUPC
To configure Jupyter Notebook server, you need to login to RUPC cluster (use rupc02 server). Next do the following steps to setup and run Jupyter Notebook.- Load Anaconda2 module:
module load anaconda2 - Generate configuration Jupyter Notebook file:
cd ~
jupyter notebook --generate-config
This command will create a default Jupyter Notebook configuration file: /home/user/.jupyter/jupyter_notebook_config.py, where user should be changed to your username. Please assume the change of user to your username in all examples and commands below.
- For security purpose, you need to setup a password for your Jupyter Notebook server:
python
>>> from notebook.auth import passwd
>>> passwd()
Enter password:<your-password>
Verify password:<your-password>
'sha1:<your-sha1-hash-value>'
>>> Ctrl+Z
Save the SHA1 hash value for later use, which will look like:
sha1:44add4a345cc:bdr1fb6343557bff721e65e78fc511c41b13e8be. - Create a self-signed certificate and the matched key:
mkdir ~/certs
chmod 700 ~/certs
cd ~/certs
openssl req -x509 -nodes -days 1095 -newkey rsa:2048 -keyout jupyterkey.key -out jupytercert.pem
The last command will generate a certificate file
The command output should look like this/home/user/certs/jupytercert.pemand the matching key file/home/user/certs/jupyterkey.key. - Open the default configuration file using text editor, for example vi:
vi /home/user/.jupyter/jupyter_notebook_config.py - Find the following lines, uncomment them and modify each of them as shown below. The final result should look like this (Please remember to change user to your username.):
c.NotebookApp.certfile = '/home/user/certs/jupytercert.pem'
c.NotebookApp.keyfile = '/home/user/certs/jupyterkey.key'
c.NotebookApp.ip = '10.10.10.2'
c.NotebookApp.open_browser = False
c.NotebookApp.password = 'sha1:<your-sha1-hash-value-from-step-#3>'
Save and quit the configuration file.
Running Jupyter Notebook
On RUPC
- Login to the cluster and load Anaconda2 module:
module load anaconda2 -
Start the Jupyter Notebook server:
Output of the command will look similar to
jupyter notebook
On your computer
- Start OpenVPN connection to RUPC
-
Open browser and visit link which was printed on RUPC while starting the Jupyter Notebook server (https://10.10.10.2:8888/ in the current example).
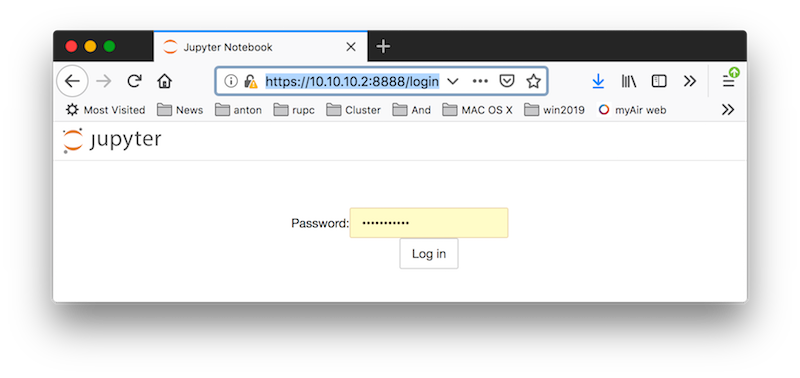
Type the password which you created while configuring the Jupyter Notebook and log in. Enjoy the Jupyter Notebook!
-
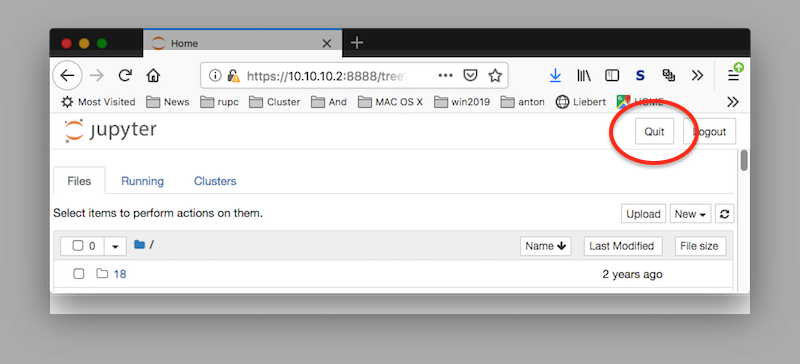
After you are done with Jupyter Notebook, please don't forget to quit Jupyter Notebook server on RUPC
clicking on Quit button at the home screen of the Jupyter Notebook. Remember, Logout button doesn't stop the kernel running on RUPC, it just ends current session in your browser, leaving Jupyter Notebook running on the cluster!:
OR issue CTRL-C command in the terminal you started the server and answer Y for confirmation.
Quick Way to Run Jupyter Notebook
This is insecure way to run Jupyter Notebook i.e. no password for the web access to your files accessible in the notebook and also no web encryption. In addition, there is a slight inconvenience to type the --ip address parameter in the command line, every time one launches the notebook.On RUPC
- Login to the cluster and load Anaconda2 module:
module load anaconda2 -
Start the Jupyter Notebook server:
Output of the command will look something like this, where the most important information is about http address and port number (see below in blue color):
jupyter notebook --no-browser --ip 10.10.10.2
Remarks
In order to run Jupyter Notebook for python3 just load corresponsing anaconda version module and procceed in the same way as described above. Take a look at the following output: where one can see commands for loading module anaconda3, starting notebook and after creating new notebook, the jupyter notebook server shutdown using CTRL-C command. Clicking Quit button on Home screen of Jupyter Notebook in your browser is more preferable way to shutdown the Jupiter server. Jupyter Notebook is also available with standard python installation on rupc02 and rupc07 i.e. one can start it without loading any modules typing the command mentioned about i.e.jupyter notebook
jupyter notebook --no-browser --ip 10.10.10.2